Android高手進階之Activity.setContentView渲染流程詳解
前言
setContentView(R.layout.activity_main)這么簡簡單單的一段代碼做了事情可不簡單;
接下來我們會跟著源碼大概走一遍這個方法,一起總結(jié)下
一、DecorView的創(chuàng)建
Activity.setContentView
- public void setContentView(@LayoutRes int layoutResID) {
- getWindow().setContentView(layoutResID); //最終調(diào)用mWindow的setContentView方法
- initWindowDecorActionBar();
- }
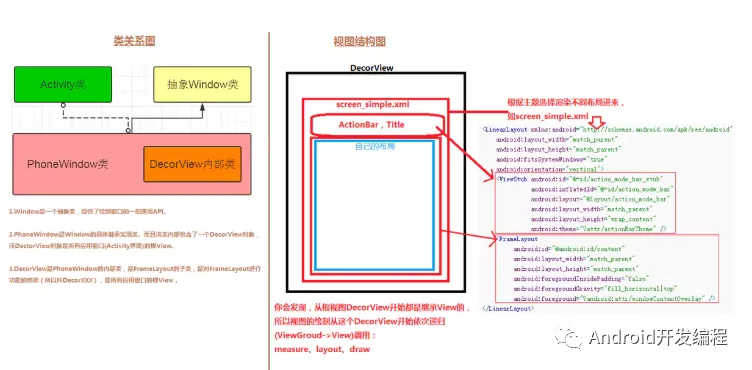
getWindow返回的是mWindow, mWindow在Activity的attach方法里被賦值,是個PhoneWindow對象。
(PhoneWindow是Window的唯一實現(xiàn)類)
- final void attach(Context context, ActivityThread aThread,
- Instrumentation instr, IBinder token, int ident,
- Application application, Intent intent, ActivityInfo info,
- CharSequence title, Activity parent, String id,
- NonConfigurationInstances lastNonConfigurationInstances,
- Configuration config, String referrer, IVoiceInteractor voiceInteractor,
- Window window, ActivityConfigCallback activityConfigCallback) {
- attachBaseContext(context);
- mFragments.attachHost(null /*parent*/);
- mWindow = new PhoneWindow(this, window, activityConfigCallback);
- ...
- mWindow.setWindowManager( //設置WindowManager
- (WindowManager)context.getSystemService(Context.WINDOW_SERVICE),
- mToken, mComponent.flattenToString(),
- (info.flags & ActivityInfo.FLAG_HARDWARE_ACCELERATED) != 0);
- if (mParent != null) {
- mWindow.setContainer(mParent.getWindow());
- }
- mWindowManager = mWindow.getWindowManager();
- }
PhoneWindow.setContentView
幾個關(guān)鍵變量
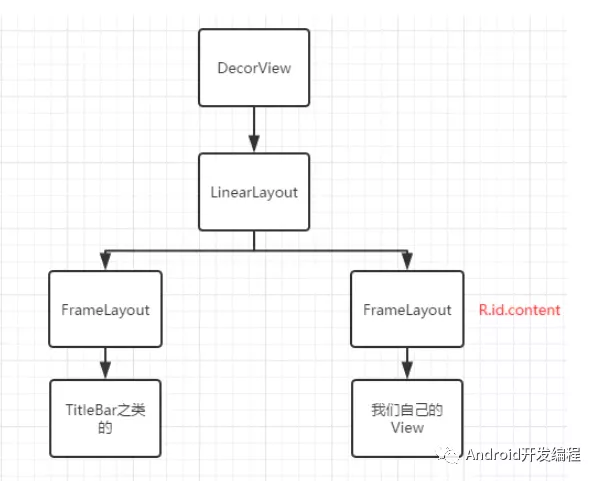
1.mDecor 是Window的最頂層的View,是個FrameLayout。
2.mContentParent 是用來真正裝載Activity傳入的布局文件的容器,本身是個ViewGroup。
- public void setContentView(int layoutResID) {
- // Note: FEATURE_CONTENT_TRANSITIONS may be set in the process of installing the window
- // decor, when theme attributes and the like are crystalized. Do not check the feature
- // before this happens.
- if (mContentParent == null) {
- installDecor(); //如果mContentParent為空,則執(zhí)行installDecor方法
- } else if (!hasFeature(FEATURE_CONTENT_TRANSITIONS)) {
- mContentParent.removeAllViews(); //否則remove掉mContentParent的所有子view
- }
- if (hasFeature(FEATURE_CONTENT_TRANSITIONS)) {
- final Scene newScene = Scene.getSceneForLayout(mContentParent, layoutResID,
- getContext());
- transitionTo(newScene);
- } else {
- mLayoutInflater.inflate(layoutResID, mContentParent); //將activity傳入的布局文件加載到mContentParent里
- }
- mContentParent.requestApplyInsets();
- final Callback cb = getCallback();
- if (cb != null && !isDestroyed()) {
- cb.onContentChanged();
- }
- mContentParentExplicitlySet = true;
- }
PhoneWindow.installDecor
- private void installDecor() {
- mForceDecorInstall = false;
- if (mDecor == null) {
- mDecor = generateDecor(-1); //如果之前沒有創(chuàng)建,直接創(chuàng)建一個
- mDecor.setDescendantFocusability(ViewGroup.FOCUS_AFTER_DESCENDANTS);
- mDecor.setIsRootNamespace(true);
- if (!mInvalidatePanelMenuPosted && mInvalidatePanelMenuFeatures != 0) {
- mDecor.postOnAnimation(mInvalidatePanelMenuRunnable);
- }
- } else {
- mDecor.setWindow(this); //將PhoneWindow傳遞給DecorView
- }
- if (mContentParent == null) {
- mContentParent = generateLayout(mDecor); //賦值mContentParent
- ...
- }
PhoneWindow.installDecor
- protected DecorView generateDecor(int featureId) {
- // System process doesn't have application context and in that case we need to directly use
- // the context we have. Otherwise we want the application context, so we don't cling to the
- // activity.
- Context context;
- if (mUseDecorContext) {
- Context applicationContext = getContext().getApplicationContext();
- if (applicationContext == null) {
- context = getContext();
- } else {
- context = new DecorContext(applicationContext, getContext());
- if (mTheme != -1) {
- context.setTheme(mTheme);
- }
- }
- } else {
- context = getContext();
- }
- return new DecorView(context, featureId, this, getAttributes()); //創(chuàng)建DecorView
- }
PhoneWindow.generateLayout
這一步是挑選合適的DecorView布局文件并將其添加大盤DecorView,同時給mContentParent賦值。
- protected ViewGroup generateLayout(DecorView decor) {
- // Apply data from current theme.
- TypedArray a = getWindowStyle();
- ......
- // Inflate the window decor.
- //根據(jù)不同的features來選擇DecorView的布局
- int layoutResource;
- int features = getLocalFeatures();
- // System.out.println("Features: 0x" + Integer.toHexString(features));
- if ((features & (1 << FEATURE_SWIPE_TO_DISMISS)) != 0) {
- layoutResource = R.layout.screen_swipe_dismiss;
- setCloseOnSwipeEnabled(true);
- } else if ((features & ((1 << FEATURE_LEFT_ICON) | (1 << FEATURE_RIGHT_ICON))) != 0) {
- if (mIsFloating) {
- TypedValue res = new TypedValue();
- getContext().getTheme().resolveAttribute(
- R.attr.dialogTitleIconsDecorLayout, res, true);
- layoutResource = res.resourceId;
- } else {
- layoutResource = R.layout.screen_title_icons;
- }
- // XXX Remove this once action bar supports these features.
- removeFeature(FEATURE_ACTION_BAR);
- // System.out.println("Title Icons!");
- } else if ((features & ((1 << FEATURE_PROGRESS) | (1 << FEATURE_INDETERMINATE_PROGRESS))) != 0
- && (features & (1 << FEATURE_ACTION_BAR)) == 0) {
- // Special case for a window with only a progress bar (and title).
- // XXX Need to have a no-title version of embedded windows.
- layoutResource = R.layout.screen_progress;
- // System.out.println("Progress!");
- } else if ((features & (1 << FEATURE_CUSTOM_TITLE)) != 0) {
- // Special case for a window with a custom title.
- // If the window is floating, we need a dialog layout
- if (mIsFloating) {
- TypedValue res = new TypedValue();
- getContext().getTheme().resolveAttribute(
- R.attr.dialogCustomTitleDecorLayout, res, true);
- layoutResource = res.resourceId;
- } else {
- layoutResource = R.layout.screen_custom_title;
- }
- // XXX Remove this once action bar supports these features.
- removeFeature(FEATURE_ACTION_BAR);
- } else if ((features & (1 << FEATURE_NO_TITLE)) == 0) {
- // If no other features and not embedded, only need a title.
- // If the window is floating, we need a dialog layout
- if (mIsFloating) {
- TypedValue res = new TypedValue();
- getContext().getTheme().resolveAttribute(
- R.attr.dialogTitleDecorLayout, res, true);
- layoutResource = res.resourceId;
- } else if ((features & (1 << FEATURE_ACTION_BAR)) != 0) {
- layoutResource = a.getResourceId(
- R.styleable.Window_windowActionBarFullscreenDecorLayout,
- R.layout.screen_action_bar);
- } else {
- layoutResource = R.layout.screen_title;
- }
- // System.out.println("Title!");
- } else if ((features & (1 << FEATURE_ACTION_MODE_OVERLAY)) != 0) {
- layoutResource = R.layout.screen_simple_overlay_action_mode;
- } else {
- // Embedded, so no decoration is needed.
- layoutResource = R.layout.screen_simple;
- // System.out.println("Simple!");
- }
- mDecor.startChanging();
- mDecor.onResourcesLoaded(mLayoutInflater, layoutResource); //挑選出來的布局添加到DecorView中
- ViewGroup contentParent = (ViewGroup)findViewById(ID_ANDROID_CONTENT); //從DecorView找出id為com.android.internal.R.id.content的容器,提供給Activity使用。
- if (contentParent == null) {
- throw new RuntimeException("Window couldn't find content container view");
- }
- ......
- return contentParent;
- }
R.layout.test
這一步純粹是為了看下DecorView布局文件長啥樣
- <LinearLayout xmlns:android="http://schemas.android.com/apk/res/android"
- android:layout_width="match_parent"
- android:layout_height="match_parent"
- android:fitsSystemWindows="true"
- android:orientation="vertical">
- <ViewStub android:id="@+id/action_mode_bar_stub"
- android:inflatedId="@+id/action_mode_bar"
- android:layout="@layout/action_mode_bar"
- android:layout_width="match_parent"
- android:layout_height="wrap_content"
- android:theme="?attr/actionBarTheme" />
- <!--真正存放Activity布局的容器-->
- <FrameLayout
- android:id="@android:id/content"
- android:layout_width="match_parent"
- android:layout_height="match_parent"
- android:foregroundInsidePadding="false"
- android:foregroundGravity="fill_horizontal|top"
- android:foreground="?android:attr/windowContentOverlay" />
- </LinearLayout>
DecorView.onResourcesLoaded
- void onResourcesLoaded(LayoutInflater inflater, int layoutResource) {
- if (mBackdropFrameRenderer != null) {
- loadBackgroundDrawablesIfNeeded();
- mBackdropFrameRenderer.onResourcesLoaded(
- this, mResizingBackgroundDrawable, mCaptionBackgroundDrawable,
- mUserCaptionBackgroundDrawable, getCurrentColor(mStatusColorViewState),
- getCurrentColor(mNavigationColorViewState));
- }
- mDecorCaptionView = createDecorCaptionView(inflater);
- final View root = inflater.inflate(layoutResource, null); //解析出布局文件
- if (mDecorCaptionView != null) {
- if (mDecorCaptionView.getParent() == null) {
- addView(mDecorCaptionView,
- new ViewGroup.LayoutParams(MATCH_PARENT, MATCH_PARENT));
- }
- mDecorCaptionView.addView(root,
- new ViewGroup.MarginLayoutParams(MATCH_PARENT, MATCH_PARENT));
- } else {
- // Put it below the color views.
- addView(root, 0, new ViewGroup.LayoutParams(MATCH_PARENT, MATCH_PARENT)); //添加到DecorView
- }
- mContentRoot = (ViewGroup) root; //mContentRoot保存的是整個跟布局容器
- initializeElevation();
- }
二、DecorView繪制到屏幕
Activity 執(zhí)行到 onCreate 時并不可見,只有執(zhí)行完 onResume 之后 Activity 中的內(nèi)容才是屏幕可見狀態(tài)。onCreate 階段只是初始化了 Activity 需要顯示的內(nèi)容,而在 onResume 階段才會將 PhoneWindow 中的 DecorView 真正的繪制到屏幕上。
在ActivityThread的handleResumeActivity方法中,調(diào)用WindowManager將decor作為窗口添加到 WMS 。
- @Override
- public void handleResumeActivity(IBinder token, boolean finalStateRequest, boolean isForward,
- String reason) {
- ......
- if (a.mVisibleFromClient) {
- if (!a.mWindowAdded) {
- a.mWindowAdded = true;
- wm.addView(decor, l); //通過WindowManager將decor添加到WMS
- } else {
- // The activity will get a callback for this {@link LayoutParams} change
- // earlier. However, at that time the decor will not be set (this is set
- // in this method), so no action will be taken. This call ensures the
- // callback occurs with the decor set.
- a.onWindowAttributesChanged(l);
- }
- }
- ......
實現(xiàn)WindowManager接口的是WindowManagerImpl類,從WINDOW_SERVICE注冊時也能看出來。
- registerService(Context.WINDOW_SERVICE, WindowManager.class, new CachedServiceFetcher<WindowManager>() {
- @Override
- public WindowManager createService(ContextImpl ctx) {
- return new WindowManagerImpl(ctx);
- }});
WindowManagerImpl.addView調(diào)用mGlobal.addView方法,mGlobal是WindowManagerGlobal類型變量。
- @Override
- public void addView(@NonNull View view, @NonNull ViewGroup.LayoutParams params) {
- applyDefaultToken(params);
- mGlobal.addView(view, params, mContext.getDisplay(), mParentWindow);
- }
WindowManagerGlobal.addView最終調(diào)的是ViewRootImpl的setView方法
- public void addView(View view, ViewGroup.LayoutParams params, Display display, Window parentWindow) {
- ......
- ViewRootImpl root;
- View panelParentView = null;
- synchronized (mLock) {
- ......
- root = new ViewRootImpl(view.getContext(), display); //創(chuàng)建ViewRootImpl對象
- view.setLayoutParams(wparams);
- mViews.add(view);
- mRoots.add(root);
- mParams.add(wparams);
- // do this last because it fires off messages to start doing things
- try {
- root.setView(view, wparams, panelParentView); //最終,調(diào)的是ViewRootImpl的setView方法
- } catch (RuntimeException e) {
- // BadTokenException or InvalidDisplayException, clean up.
- if (index >= 0) {
- removeViewLocked(index, true);
- }
- throw e;
- }
- }
- }
ViewRootImpl.setView
- public void setView(View view, WindowManager.LayoutParams attrs, View panelParentView) {
- synchronized (this) {
- if (mView == null) {
- ......
- int res; /* = WindowManagerImpl.ADD_OKAY; */
- // Schedule the first layout -before- adding to the window
- // manager, to make sure we do the relayout before receiving
- // any other events from the system.
- requestLayout(); //調(diào)用此方法后 ViewRootImpl 所關(guān)聯(lián)的 View 也執(zhí)行 measure - layout - draw 操作,確保在 View 被添加到 Window 上顯示到屏幕之前,已經(jīng)完成測量和繪制操作。
- ......
- try {
- mOrigWindowType = mWindowAttributes.type;
- mAttachInfo.mRecomputeGlobalAttributes = true;
- collectViewAttributes();
- // mWindowSession 的 addToDisplay 方法將 View 添加到 WMS 中。
- res = mWindowSession.addToDisplay(mWindow, mSeq, mWindowAttributes,
- getHostVisibility(), mDisplay.getDisplayId(), mWinFrame,
- mAttachInfo.mContentInsets, mAttachInfo.mStableInsets,
- mAttachInfo.mOutsets, mAttachInfo.mDisplayCutout, mInputChannel);
- } catch (RemoteException e) {
- mAdded = false;
- mView = null;
- mAttachInfo.mRootView = null;
- mInputChannel = null;
- mFallbackEventHandler.setView(null);
- unscheduleTraversals();
- setAccessibilityFocus(null, null);
- throw new RuntimeException("Adding window failed", e);
- } finally {
- if (restore) {
- attrs.restore();
- }
- }
- }
- ......
- }
- }
WindowSession實例獲取,是IWindowSession類型,通過Binder機制調(diào)用System 進程中的 Session實現(xiàn)。
- public static IWindowSession getWindowSession() {
- synchronized (WindowManagerGlobal.class) {
- if (sWindowSession == null) {
- try {
- InputMethodManager imm = InputMethodManager.getInstance();
- IWindowManager windowManager = getWindowManagerService();
- sWindowSession = windowManager.openSession(
- new IWindowSessionCallback.Stub() {
- @Override
- public void onAnimatorScaleChanged(float scale) {
- ValueAnimator.setDurationScale(scale);
- }
- },
- imm.getClient(), imm.getInputContext());
- } catch (RemoteException e) {
- throw e.rethrowFromSystemServer();
- }
- }
- return sWindowSession;
- }
- }
addToDisplay真正實現(xiàn)。
- @Override
- public int addToDisplay(IWindow window, int seq, WindowManager.LayoutParams attrs,
- int viewVisibility, int displayId, Rect outFrame, Rect outContentInsets,
- Rect outStableInsets, Rect outOutsets,
- DisplayCutout.ParcelableWrapper outDisplayCutout, InputChannel outInputChannel,
- InsetsState outInsetsState) {
- return mService.addWindow(this, window, seq, attrs, viewVisibility, displayId, outFrame,
- outContentInsets, outStableInsets, outOutsets, outDisplayCutout, outInputChannel,
- outInsetsState);
- }
至此,Window 已經(jīng)成功的被傳遞給了 WMS。剩下的工作就全部轉(zhuǎn)移到系統(tǒng)進程中的 WMS 來完成最終的添加操作。
三、觸摸事件處理
ViewRootImpl 中的 setView 方法中,除了調(diào)用 IWindowSession 執(zhí)行跨進程添加 View 之外,還有一項重要的操作就是設置輸入事件的處理:
- public void setView(View view, WindowManager.LayoutParams attrs, View panelParentView) {
- ......
- // Set up the input pipeline.
- CharSequence counterSuffix = attrs.getTitle();
- mSyntheticInputStage = new SyntheticInputStage();
- InputStage viewPostImeStage = new ViewPostImeInputStage(mSyntheticInputStage);
- InputStage nativePostImeStage = new NativePostImeInputStage(viewPostImeStage,
- "aq:native-post-ime:" + counterSuffix);
- InputStage earlyPostImeStage = new EarlyPostImeInputStage(nativePostImeStage);
- InputStage imeStage = new ImeInputStage(earlyPostImeStage,
- "aq:ime:" + counterSuffix);
- InputStage viewPreImeStage = new ViewPreImeInputStage(imeStage);
- InputStage nativePreImeStage = new NativePreImeInputStage(viewPreImeStage,
- "aq:native-pre-ime:" + counterSuffix);
- ......
- }
最終會經(jīng)過ViewPostImeInputStage的onProcess處理
- final class ViewPostImeInputStage extends InputStage {
- public ViewPostImeInputStage(InputStage next) {
- super(next);
- }
- @Override
- protected int onProcess(QueuedInputEvent q) {
- if (q.mEvent instanceof KeyEvent) {
- return processKeyEvent(q);
- } else {
- final int source = q.mEvent.getSource();
- if ((source & InputDevice.SOURCE_CLASS_POINTER) != 0) {
- return processPointerEvent(q);
- } else if ((source & InputDevice.SOURCE_CLASS_TRACKBALL) != 0) {
- return processTrackballEvent(q);
- } else {
- return processGenericMotionEvent(q);
- }
- }
- }
processPointerEvent方法,調(diào)用mView的dispatchPointerEvent 分發(fā)事件。mView是DecorView對象
- private int processPointerEvent(QueuedInputEvent q) {
- ......
- boolean handled = mView.dispatchPointerEvent(event);
- ......
- return handled ? FINISH_HANDLED : FORWARD;
- }
dispatchPointerEvent是View實現(xiàn)的,最終調(diào)的是dispatchTouchEvent方法。
- public final boolean dispatchPointerEvent(MotionEvent event) {
- if (event.isTouchEvent()) {
- return dispatchTouchEvent(event);
- } else {
- return dispatchGenericMotionEvent(event);
- }
- }
DecorView.dispatchTouchEvent最終調(diào)用PhoneWindow的Callback分發(fā)事件。
- @Override
- public boolean dispatchTouchEvent(MotionEvent ev) {
- final Window.Callback cb = mWindow.getCallback();
- return cb != null && !mWindow.isDestroyed() && mFeatureId < 0
- ? cb.dispatchTouchEvent(ev) : super.dispatchTouchEvent(ev);
- }
PhoneWindow的Callback是在Activity的attach時設置的
- final void attach(Context context, ActivityThread aThread,
- Instrumentation instr, IBinder token, int ident,
- Application application, Intent intent, ActivityInfo info,
- CharSequence title, Activity parent, String id,
- NonConfigurationInstances lastNonConfigurationInstances,
- Configuration config, String referrer, IVoiceInteractor voiceInteractor,
- Window window, ActivityConfigCallback activityConfigCallback) {
- attachBaseContext(context);
- mFragments.attachHost(null /*parent*/);
- mWindow = new PhoneWindow(this, window, activityConfigCallback);
- mWindow.setWindowControllerCallback(this);
- mWindow.setCallback(this); //將Activity對象傳遞給PhoneWindow
- ......
- }
下面就回到了我們熟悉的Activity的dispatchTouchEvent方法:
- public boolean dispatchTouchEvent(MotionEvent ev) {
- if (ev.getAction() == MotionEvent.ACTION_DOWN) {
- onUserInteraction();
- }
- if (getWindow().superDispatchTouchEvent(ev)) { //調(diào)用PhoneWindow的superDispatchTouchEvent方法
- return true;
- }
- return onTouchEvent(ev);
- }
PhoneWindow.superDispatchTouchEvent,歸根結(jié)底還是調(diào)的DecorView的superDispatchTouchEvent方法
- @Override
- public boolean superDispatchTouchEvent(MotionEvent event) {
- return mDecor.superDispatchTouchEvent(event);
- }
DecorView.superDispatchTouchEvent,調(diào)用ViewGroup的dispatchTouchEvent方法。
- public boolean superDispatchTouchEvent(MotionEvent event) {
- return super.dispatchTouchEvent(event);
- }
總結(jié)
1.整個過程Activity參與度很低,基本靠PhoneWindow實現(xiàn)。
2.onCreate階段創(chuàng)建了DecorView,onResume階段將DecorView添加到WMS并展示,ViewRootImple對象也是onResume階段創(chuàng)建的,所以也解釋了onCreate階段子線程加載view并不會報錯。
3.ViewRootImpl 的 setView 方法中主要完成兩件事情:View 渲染(requestLayout)以及接收觸屏事件。
4.一個 Activity 中有一個 window,也就是 PhoneWindow 對象,每一個 PhoneWindow 對應一個 ViewRootImple 對象。
本文轉(zhuǎn)載自微信公眾號「Android開發(fā)編程」